One of my most favorite things about owning a electronic die cutting machine is having the ability to create my own custom titles for my pages. I have really been doing this a lot in the past month, and I thought I would share my process
I’m working on a layout called Shutterbug, right now that want to make a custom title for, so I thought I would use it as an example here
1. I have to come up with a snazzy title. In this case, my title is just pure fact.
2. If I’m going to make my own title on my Silhouette I decide if I want to make it with a font, or write it out myself. In most cases I just can’t get a font to look exactly the way I want so instead I just write it out. I also feel like this gives me a little more of a personal feel to the page. Usually I just write it out a few times, until I get something I feel like looks nice and will fit well with the design of the page.
* most of the time if I have a title that has multiple words I only do one word in the die cut, it seems to stand out more to me that way.
* I could also do this on my wacom tablet, but I haven’t quite got the hang of the pressure sensitivity and such to make it actually look like I wrote it. ;)
3. From here I usually scan my handwritten word into my computer, I have an all-in-one style printer that came with special software for scanning various types of images, but I find it most helpful to do it through Picasa, which is a free program provided by Google.

4. I usually crop out any unnecessary things picked up on the scan, if some unwanted little marks come up in the scan too close to the word I usually just open up my photoshop elements and use the eraser tool to get rid of them. If you are using Picasa to crop as well, you must remember to save your cropped file before opening it in Silhouette Studio. Otherwise it will be an 8.5X11 in. image.

*This is where Silhouette Studio comes into play. but you can also do a similar thing on Make the Cut, which I know how to do, if anyone wants to learn how to do it you can just email me.
Before we get into the technical stuff I think I should tell you what each button is/does!

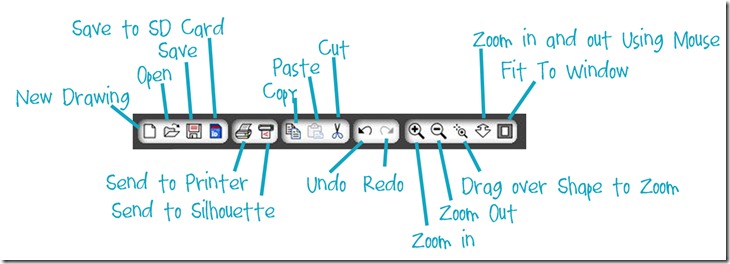
(click on the image to see it full size)
5. In the Silhouette Studio Software, I open up my scanned file.
 As you can see I do this quite a bit!
* Here’s what it looks like after it is opened:

6. I open up the Trace window, which allows you to trace your image. it is fairly easy to do, but it seems like it took me forever to find!

*Once You have drawn your Trace box around your image it will look something like this
7. while using the trace tool, you have to play around with the High & Low Pass Filters, Threshold, & Scale… This was just a guessing game for me, I just increase the High Pass Filter mainly, until the entire image is filled with yellow! Like this:

8. After the entire image is filled with yellow, all you have to do is press the Trace Button on the Right side of the window.
*This is what it looks like when it is traced, you can’t really tell from the screenshot, but there is a THIN red line around the word. All you have to do is delete the original scan image from your workspace.

* Here’s what it will look like once you’ve deleted the blacked in image:

This is going to be what your cut image will look like!
9. Now it’s time to cut! Make sure your image is the correct size for your project and then click the Send to Silhouette Button
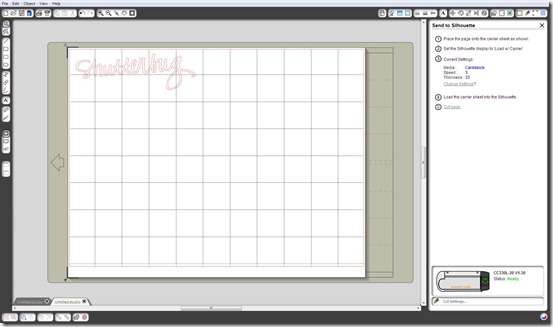
*This is what the Cutting Window will look like!
*Make sure your Cut Setting are correct for the type of medium you are cutting on, so for my example I’m cutting my image out of a scrap of Core’Dinations Cardstock, which is pretty thick. So For my settings I used the default Thick Cardstock Settings:

* The settings are Speed: 3 & Thickness: 33, using the Pink Blade Cover!
10. Now it’s time to cut! Load up your mat into your Silhouette and when you are on the Cut window, there is clickable link for #5, click that and it will send the image to your Silhouette to cut!

* This is what it looks like as you are cutting
Here’s my finished custom image title:

I hope you found this tutorial easy to follow and of course useful!


